Using smallstep as an Internal Certificate Authority
Background
As I spend more and more time building out my homelab the certificate error notices that browsers raise in response to self-signed certificates have started to niggle. Sure, I could keep adding local exceptions to suppress the alerts, but then a quick look at the address bar reminds me that all is not as it should be.

To tackle this I decided to deploy my own Internal Certificate Authority (CA) to provide a source of trust for the various servers, workloads and clients in my lab. I briefly considered standing up a dedicated machine using a Raspberry Pi but, at the time of writing, they continue to be in extremely short supply. I then started to look at container based options and came across step-ca, an open source CA that seemed to meet a lot of my requirements.
The rest of this post documents the steps that I went through to install and configure a basic PKI using step-ca. It’s mainly intended as a reference for my own use in the future, but others may find it useful if they have similar homelab environments.
Goal
My aim in deploying step-ca is to have an Internal CA hosted in a Docker container that can then be used to issue certificates for the various servers and workloads in my homelab.
Install Step Components
Before you can start to mint certificates using step-ca, you need to install the step CLI tool on the Docker host that will run your step-ca container.
To do that, follow the well-documented installation guide from smallstep.
Once step is installed on the Docker host, install step-ca via a Docker container. The instructions for doing that are here.
Verify Installation
Verify the installation of step-cli on the host by running:
$ step version
Smallstep CLI/0.21.0 (linux/amd64)
Release Date: 2022-07-06T22:23:54Z
Verify the installation of step-ca in the Docker container by attaching to the container console and running:
$ step ca health
ok
:memo: Note: If you use the Docker container, there is no need to complete the ‘Initialize your certificate authority step’ in the smallstep Getting Started guide. You will however need to retrieve the password used to decrypt the provisioner key from inside the step-ca container and make a note of it.
docker run -v step:/home/step smallstep/step-ca cat secrets/password
You can now use step to retrieve the root certificate from step-ca so that you can import it into your local machine’s certificate store. In Firefox, you do this by going to Certificate Manager and then importing the X.509 certificate. The command to retrieve the contents of the root certificate is:
step ca root
Generating Certificates
With your CA configured, you can use it to generate a certificate for each entity that you want to include in your PKI. The basic command for this is:
step ca certificate svc.example.com svc.crt svc.key
:memo: Note: The Common Name specified must match the FQDN of the host that the certificate will be installed on.
Certificate Lifetimes
By default, the certificate lifetime set by the authority-admin provisioner in smallstep is set to 24 hours. If you want to extend the certificate lifetime you can do so by adding the --not-after flag. For example, the following command will generate a certificate that has a lifetime of 30 days.
:memo:Note: In order for the CA to be able to issue certificates that have a longer life than 24 hourse you need to change the maximum allowed lifetime setting for the provisioner in step-ca. See the ‘Issues’ section below for further details of how to do that.
step ca certificate svc.example.com svc.crt svc.key --not-after=730h
Subject Alternative Names
The basic certificate generation command show above will only provide a valid certificate for the Common Name specified. If you will access the server by typing its IP address or its FQDN, you will need to specify Subject Alternative Names (SANs) by adding one or more --san flags to the command.
In the following example, the CN of the certificate will be foobar; however, because additional SANs are configured and foobar is not one of them, foobar will not be in the list of SANs for the certificate.
step ca certificate --san 1.1.1.1 --san hello.example.com --san 10.2.3.4 foobar svc.crt svc.key
Using Certificates
Once you’ve generated your certs, copy them over to the servers / workloads that will use them. The exact method varies by system, but the following couple of sections describe how to do this for key services in my homelab.
pfSense
- Navigate to
System -> Cert. Manager -> Certificatesand then click theAdd/Signbutton. - Select
Import an existing Certificatefrom theMethoddropdown box and then provide the requested details.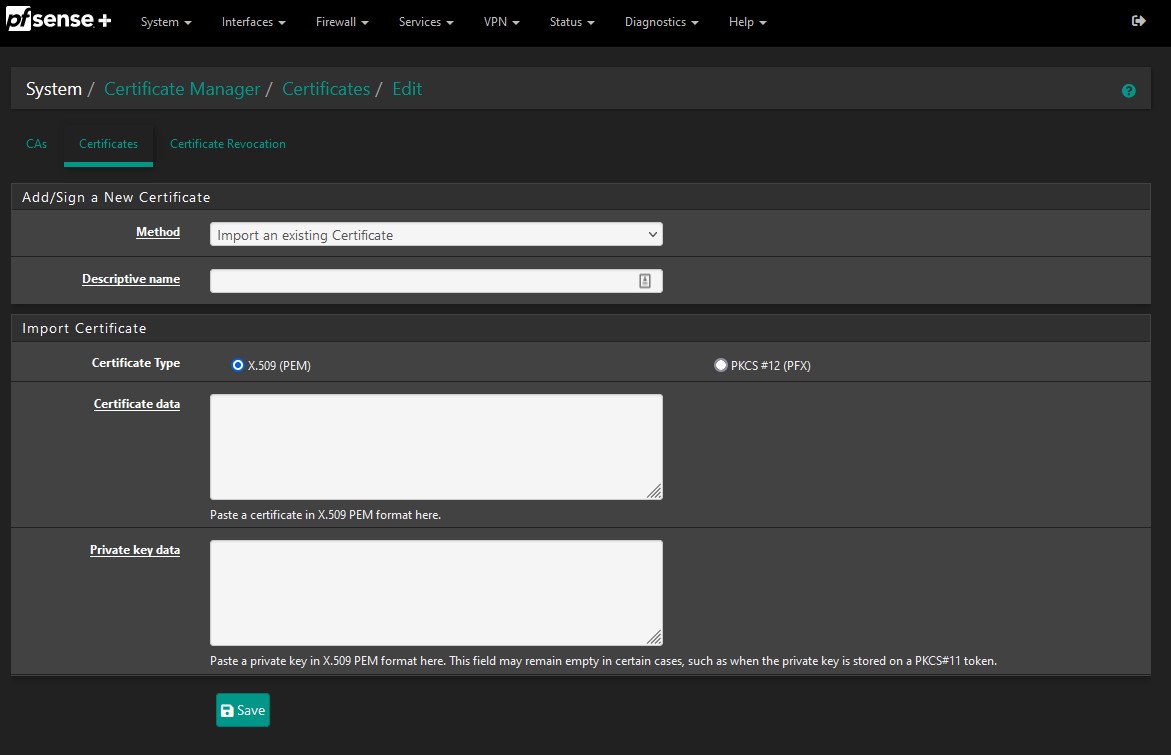
- If you’re using the certificate for the pfSense web UI then you need to tell pfSense to use it by going to
System -> Advancedand then selecting the correct certificate under theSSL/TLS Certificatesection. Once the change is applied the UI will automatically refresh and start to use the new certificate.
Proxmox
- Navigate to the Proxmox web UI and select the name of your Proxmox host from the list of servers on the left-hand side.
- Select
System -> Certificatesand then click theUpload Custom Certificatebutton. - Copy the required details into the fields or else upload the
.keyand.crtfiles you generated for Proxmox.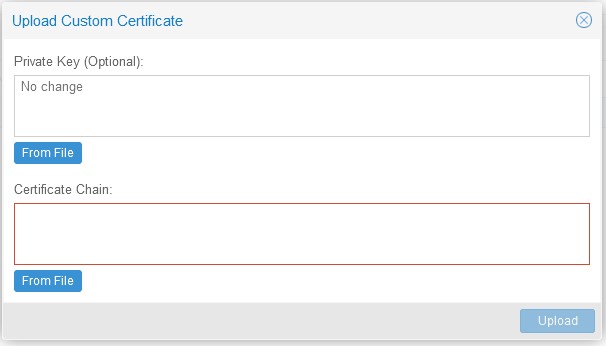
Automating Certificate Renewal
By default, the certificates you’ve created will expire after 24 hours. This is good for security, but not great for ops if you don’t have a way of automatically renewing them.
Install step
As with our original host, in order to interact with step-ca you need to install the step CLI tool on each host that needs to request / renew its cert. See the smallstep website for installation instructions.
Establish trust with the Internal CA
You now need to tell your server which CA it should request certificates from. To do this:
- Retrieve the fingerprint of the
root_ca.crtcertificate from the step-ca Docker container. Run the following command from the Docker host:docker run -v step:/home/step smallstep/step-ca step certificate fingerprint certs/root_ca.crt - Specify the URL of your internal CA and add the root_ca certificate to the server that will be requesting a new certificate.
step ca bootstrap \ --ca-url https://ca.local.lan:9000 \ # the address of the CA on your network --fingerprint 0d7d3834cf187726cf331c40a31aa7ef6b29ba4df601416c9788f6ee01058cf3 - Check the health of the CA. This will also flag if there are any certificate error warnings when talking to the CA.
step ca health --ca-url https://ca.local.lan:9000 --root ~/.step/certs/root_ca.crt
:memo: Note: If you’ve deployed your CA in a Docker container you will need to specify the port number that the container is listening on in the value of
--ca-url.
Request a new cert from the CA
Now that your server trusts your CA, you can go ahead and ask the CA to issue a certificate.
step ca certificate --san server.local.lan --san 192.168.10.1 server server.crt server.key
✔ Provisioner: admin (JWK)
Please enter the password to decrypt the provisioner key:
✔ CA: https://ca.local.lan:9000
✔ Certificate: server.crt
✔ Private Key: server.key
To check all is well with the new certificate, issue the following command:
step certificate inspect server.crt --short
X.509v3 TLS Certificate (ECDSA P-256) [Serial: 8812...6329]
  Subject:     server
               server.local.lan
               192.168.10.1
  Issuer:      Smallstep Intermediate CA
  Provisioner: admin [ID: _S53...FFic]
  Valid from:  2022-10-07T13:47:36Z
          to:  2022-10-08T13:48:36Z
Automating renewals
With the local server able to contact the CA to request certificates it’s now simply a matter of scheduling the step command to request a certificate renewal before the existing one expires. There are a few different ways of doing this but smallstep recommend using systemd timers
Issues
In my local environment pfSense and Proxmox don’t support integration with step-ca out of the box. They do support ACME, but unfortunately not via a custom client at this point in time.
It’s therefore necessary to manually provision certs for pfSense and Proxmox, which makes it infeasible to provide short-lived certificates that are renewed every 24 hours (the default maximum lifetime for certificates produced by step-ca).
As a result I decided to use step-ca to issue long-lived certs for these two servers, with the certs having a life of 395 days. To get step-ca to agree to this, it’s necessary to modify the ca.json config file to add the following lines into the authority section of the file:
...
"authority": {
    "claims": {
      "maxTLSCertDuration": "9480h",
      "defaultTLSCertDuration": "24h"
     },
"provisioners": [
...
A lifetime of 395 days isn’t ideal, but it strikes a balance between security and usability. In a production environment I could spend more time working out how to get automated renewals working, but as this PKI is only serving my homelab I can cope with the tradeoff. After all, it wasn’t so long ago that production web servers used to use certificates with a lifetime of two or even three years!
Next Steps
With a working internal CA that’s able to issue certificates for my key servers, my next step will be to deploy a reverse-proxy in front of the various Docker containers that I use in my homelab so that I can benefit from TLS between my clients and the reverse proxy.
I also plan to investigate options for issuing and automatically renewing TLS certificates for each Docker container to get closer to a ‘zero trust’ model; however, what I’ve read so far suggests that there isn’t a standard way of doing this (which is why people stick with terminating TLS connections on a reverse-proxy).