Publishing web apps using NGINX Proxy Manager
Background
Most of my homelab is dedicated to trying out new technologies and so is only accessible on a specific network segment at my house. This is both for security (amongst other things I run deliberately vulnerable VMs or containers to test out security tools) but also to avoid impacting my family’s internet access. Experience has taught me not to make breaking changes at the same time that our children want to watch Netflix!
Occassionally though, I have a use case for an app or service that means I want to expose it via the internet so that it can be accessed by friends and/or family. In such instances I use a reverse proxy to manage and secure the traffic between the users and whatever service they’re using. The purpose of this post is to document the basic setup that I use to expose services running in my home network via NGINX Proxy Manager (NPM).
Pre-requisites
The following should be in place before installing and configuring NPM:
- Purchase (or otherwise obtain) a domain name that you can use to access your service. I use
mattdams.techfor my externally facing services. - Ask your ISP to assign you a static IP.
- N.B. This isn’t strictly required, but it saves having to deal with Dynamic DNS (DDNS) and it’s more representative of how most production networks are set up, so I’d recommend it.
- The web app / service that you want to make accessible via NPM should be up and running in your local network. In my case I have a instance of Kanboard that’s running on one of my Docker hosts.
Configure Cloudflare DNS
Transfer nameservers
With the above pre-reqs in place, the first step is to transfer the nameservers for your domain from the domain registrar to Cloudflare. This will allow you to use Cloudflare to manage the DNS settings for your domain, and proxy incoming traffic to your new web service via Cloudflare’s servers.
The benefit of using the Cloudflare proxy is that your home IP address (assuming you’re hosting your web app at home) will be hidden behind Cloudflare. Anyone attempting to attack your web app will therefore need to go through Cloudflare first, which allows you to deploy anti-DDoS and other attack mitigation measures.
The full instructions for transferring your domain to Cloudflare’s nameservers are here.
Set an A record
Once Cloudflare is managing your DNS records, login to https://dash.cloudflare.com and configure a DNS A record for a subdomain so that it points to your actual public IP address.
| Type | Name | Content | Proxy Status | TTL |
|---|---|---|---|---|
| A | <subdomain name> | <your public IP> | Proxied | Auto |
Set up port forwarding
With the A record configured, Cloudflare DNS will send anyone who enters the subdomain (e.g. https://test.mattadams.tech) to the public IP address of your router.
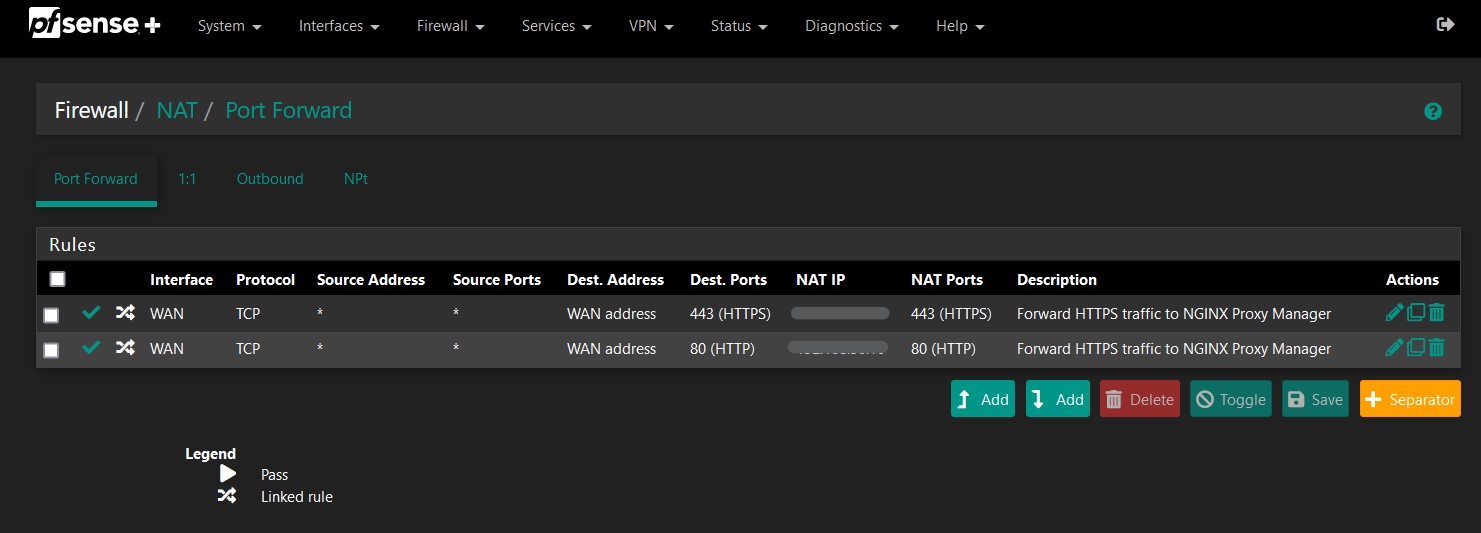
You now need to configure your router to forward ports 80 (HTTP) and 443 (HTTPS). In my case, this is done by navigating to Firewall -> NAT in the pfSense web console and adding a couple of NAT rules.
Install NGINX Proxy Manager
Initial Run
We can now go ahead and install NPM on a host in our local network by following the instructions in the NPM documentation pages. This will stand up a new Docker container running NPM that you can access by going to http://<IP of Docker host>:81
Configure Proxy Host
:memo:Note: Before adding a web app / service to NPM, ensure that it’s running on the same Docker network as NPM.
After changing the default admin password for NPM, select Hosts -> Proxy Hosts from the navigation menu, then click Add Proxy Host.
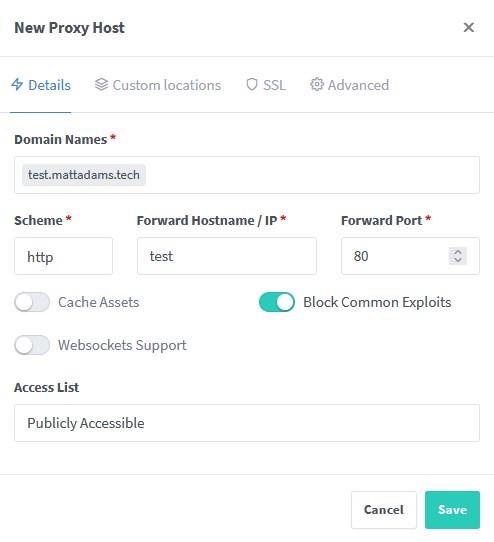
Details Tab
-
In the
Domain Namesfield add the A record you set in Cloudflare, plus the name of your domain. -
The
Schemecan be eitherhttporhttpsand is dependent on the service you’re running. -
Set the
Forward Hostname / IPto be the name of the Docker container you want NPM to forward traffic to. You can put an IP address here but a hostname is more reliable as the IP address may change if / when you update the container image and redeploy the container. -
The
Forward Portis the port that the Docker container is configured to listen on. -
Click the
Block Common Exploitsslider to enable a few basic protections against SQL injection attacks, malcicious file injections and a few other exploit types (e.g. Local File Inclusion attacks). -
Leave the
Access Listset toPublicly Accessiblefor now, but be aware that you can use NPM to put access restrictions on specific proxy hosts that you only want to make available to specific users and / or from a specific location.
SSL Tab
One of the key benefits of using a reverse proxy (as opposed to simply using your router to directly port forward external traffic to your service) is the ability for the reverse proxy to provision and manage SSL / TLS certificates for your services. To configure this, navigate to the SSL tab.

-
Unless you’ve previously created a certificate, or are using a wildcard certificate for your subdomains, select
Request a new SSL Certificate. -
You should enable the
Force SSLoption as a minimum, but there is also options to enable HTTP/2 Support and HSTS depending on your requirements. -
Enter a legitimate email address for Let’s Encrypt so that the CA can notify you if there are any problems with your certificates.
-
Lastly, agree to the terms of service and click
Saveto create your new proxy host.
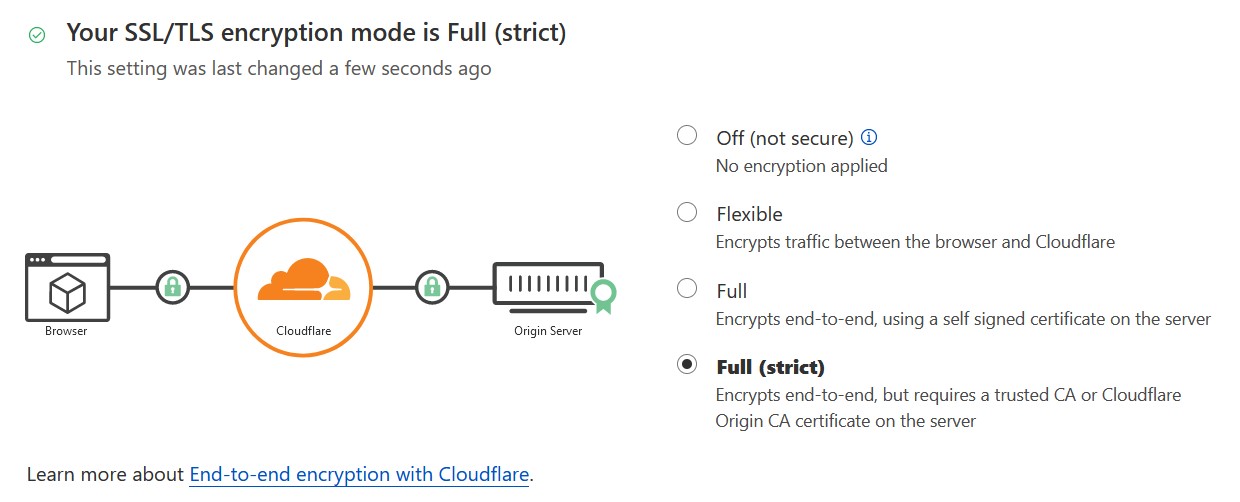
Configure Cloudflare SSL/TLS
Now that we have at least one TLS certificate issued by Let’s Encrypt, the final step before we’re ready to test involves going back to Cloudflare and checking that the SSL/TLS encryption mode is set to Full (strict). This ensures that traffic between clients and your web service will be encrypted between the browser and NPM.
Test Everything Works
Having gone through the previous steps, you should now be able to enter the URL you specfied for your web service (e.g. https://test.mattadams.tech) in your browser and be sent to the correct service via a combination of Cloudflare DNS and NPM.
Your browser should report that the connection is secure and, digging a little deeper (the process is slightly different depending on the browser you’re using), you should be able to identify the Cloudflare and Let’s Encrypt certificates that are being used, as well as the TLS version that the connection is being secured with.