Creating a custom knowledge base for GPT-3.5
Background
Like many people I’ve recently been experimenting with OpenAI’s API to try out some ideas for leveraging Large Language Models (LLMs) in my day-to-day work. One of the ideas I had was to see whether I could create a chatbot that would help users to interact more easily with a framework such as MITRE ATT&CK. This post documents the steps I went through to create a proof-of-concept application that integrates a custom knowledge base with GPT-3.5 to enable users to utilise the ATT&CK framework through a chat-based interface.
Why use a custom knowledge base?
While services such as ChatGPT are incredible sources of general knowledge, they begin to struggle when they’re asked to provide responses on more niche topics. In such scenarios, where the model doesn’t have the required information in its training data it will often respond with something spurious (albeit possibly quite convincing to a person who doesn’t understand the topic that well).
One option to overcome this is to provide the required data in the prompt you supply to the chatbot; however, this can be cumbersome to do for each prompt and the volume of data you can provide in this way is very limited.
An alternative method is to train the model on a custom knowledge base which it can then use to generate more specific answers to niche / technical questions.
Considerations for training a custom knowledge base
- It’s preferable to use a reasonably spec’d computer to complete the training process, although a lower-end machine can be used for testing purposes. If you need to train a larger data set then a more powerful computer is strongly recommened.
- The data set should be in English to get the best results, although it will work with some other languages. Consult OpenAPI’s documentation for further details of the supported languades.
Pre-requisites
You can use a Windows / Mac / Linux machine to complete the following steps, but you will need the following installed:
- Python
- Pip (Python package manager)
Once you have Python and Pip up and running, use Pip to install the following Python libraries:
- openai
- llama_index (previously gpt_index)
- PyPDF2 (required to parse PDF files)
- gradio
Lastly, you will need an OpenAI API key that’s associated with your OpenAI account.
Training the model
With all of our pre-requisites in place, it’s time to train the model that our chatbot will use. To do this, create a new folder called source_data on your machine. You can call it something else, but you will need to remember to update the code below to reflect that.
Preparing documents
Next, copy all of the documents that you want to use for training inside the source_data folder. Multiple file types are supported, including text, PDF and CSV files. In my case I took the Excel version of the MITRE ATT&CK framework and converted the key worksheets (i.e. Tactics, Techniques, Groups, etc.) into CSV files before uploading them. I made a few changes to the column headings to, for example, enable the model to differentiate between different types of ID fields.
Tweaking the code
Copy the following code block into your preferred editor and, as a minimum, update it to add your own OpenAI API key.
Once you’re happy with the code, save it as app.py in the same location as the source_data folder.
import os
from llama_index import (
    SimpleDirectoryReader,
    GPTSimpleVectorIndex,
    LLMPredictor,
    PromptHelper,
)
from langchain import OpenAI
import gradio as gr

# Provide your OpenAI API key
api_key = os.environ["OPENAI_API_KEY"] = 'INSERT YOUR API KEY HERE'

def create_and_save_index(directory_path):
    """Create an index from a directory and save it to a file."""
    max_input_size = 4096
    num_outputs = 512
    max_chunk_overlap = 20
    chunk_size_limit = 600

    prompt_helper = PromptHelper(
        max_input_size,
        num_outputs,
        max_chunk_overlap,
        chunk_size_limit=chunk_size_limit,
    )

    llm_predictor = LLMPredictor(
        llm=OpenAI(
            temperature=0, model_name="gpt-3.5-turbo", max_tokens=num_outputs #Change the model name and temperature as required
        )
    )

    documents = SimpleDirectoryReader(directory_path).load_data()

    index = GPTSimpleVectorIndex(
        documents, llm_predictor=llm_predictor, prompt_helper=prompt_helper
    )

    index.save_to_disk("index.json")

    return index


def generate_response(input_text):
    """Load the index from disk and generate a response for the input text."""
    index = GPTSimpleVectorIndex.load_from_disk("index.json")
    response = index.query(input_text, response_mode="compact")
    return response.response


if __name__ == "__main__":
    iface = gr.Interface(
        fn=generate_response,
        inputs=gr.inputs.Textbox(lines=7, label="Enter your query:"),
        outputs="text",
        title="ATT&CK Bot",
    )

    index = create_and_save_index("source_data")
    iface.launch(share=True)
Running the code
To run the code and start indexing your source data, use the Command Prompt / Bash shell to navigate to the location where you saved app.py and then run:
python app.py
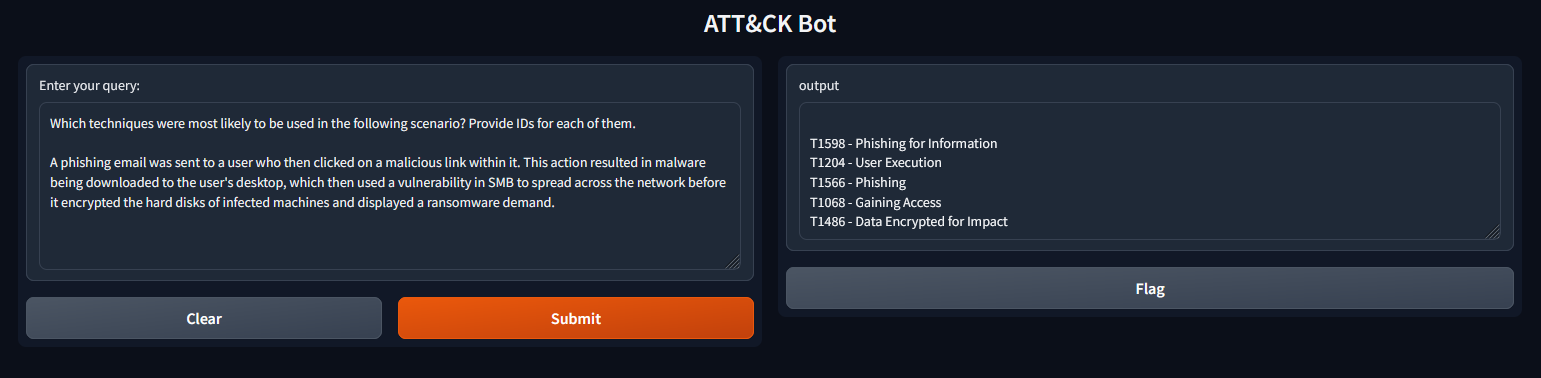
Your source data will be analysed and indexed into an index.json file. Once the script has finished you will be given a local URL. Pointing your browser to that URL will enable you to access the chatbot interface.
You can now start interacting with the chatbot that has been trained on your own custom knowledge base.
References
How to train an AI Chatbot with Custom Knowledge Base using ChatGPT API